Welcome to the interactive quiz generator, specially designed for Chinese language learners! This product manual will guide you through the process of using our interactive quiz generator to test and improve your Chinese language skills.
1. Features:
- Dictation Quiz: Our dictation quiz feature allows you to test listening skills. You can generate audio from text or even record yourself to create personalized quizzes.
- Phonetics Display: With this feature, you can easily add Pinyin or Zhuyin to your test.
- Sentence Scramble questions: Our sentence scramble feature allows you to practice your grammar and sentence structure skills by putting sentences in the correct order.
- Speaking test: You can ask examinees to record their voice allows for an accurate and comprehensive evaluation of their speaking abilities.
- Word search: Instead of having examinees simply key in the characters, you can provide a list of possible characters that they can choose from. This allows test takers to focus more on understanding the meaning of the words and selecting the correct character, rather than trying to remember how to input them.
- Auto generate from a Vocabulary List or Sentence List: With our auto-generation feature, you can generate quizzes from a vocabulary list or sentence list. This saves you time and effort, while still providing personalized quizzes.
2. Create a Quiz
When you open the quiz maker, you will see an interface as below
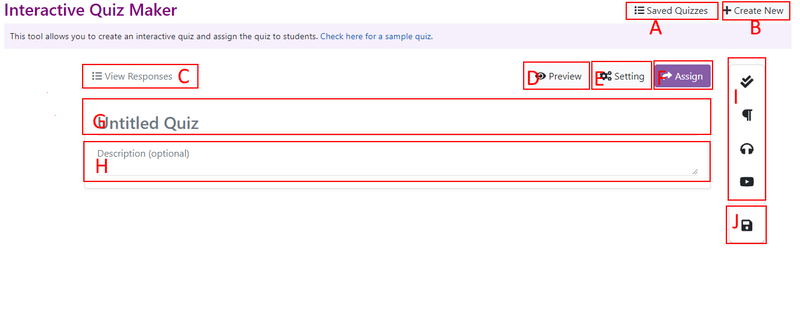
- A: This section displays all of your created quizzes in a list format. You can quickly access any of your quizzes by clicking on its name.
- B: Create a new quiz
- C: This section displays the responses submitted by your examinees for the quizzes you have assigned to them. You can review individual responses, as well as overall performance statistics.
- D: This button allows you to preview your quiz from the examinee's perspective, giving you a better understanding of how the quiz will be presented to them. You can also print the quiz as a PDF document from here.
- E: This button allows you to customize the settings for your quiz, such as background color, font style, whether examinees’ information is needed or not.
- F: Get link for the quiz and share with examinees.
- G: Edit the quiz title.
- H: This field is optional, but can be used to provide additional context or instructions for your quiz
- I: This section allows you to add different types of content to your quiz, such as questions, text blocks, audio, and video.
- J: This button allows you to save your quiz and any changes you have made to it
2.1 Adding questions
To add questions, please click on the double check icon on the right side bar. You will see a popup for question adding.
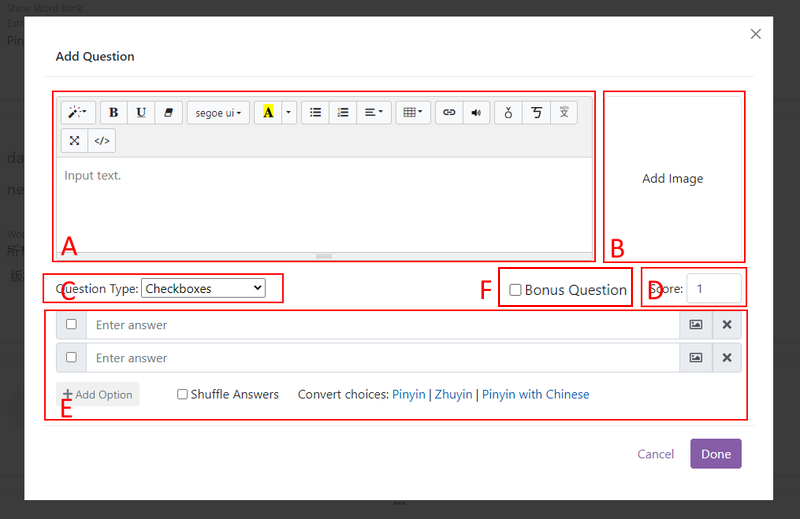
- A: Question/Instruction Text: This section allows you to input the text of your question or provide instructions for your examinees. You can use the formatting tools provided to adjust the font size, weight, color, and alignment of your text.

We also provide buttons allow you to convert selected Chinese text into Pinyin (pīnyīn) / Zhuyin (ㄆ丨ㄣ 一ㄣ) or Chinese with Pinyin annotation (with Pinyin on the top of Chinese words), e.g.

- B: Image Placeholder: This box allows you to add an image as part of your question. Simply click on the box to search and choose an image from Google, or provide a URL to an image hosted online.
- C: Question Type Dropdown: This dropdown menu allows you to select the type of question you would like to add.
- D: Score Value: This section allows you to specify the point value for your question. You can assign a score ranging from 0 to any number you desire, and the total score for each quiz is automatically calculated based on the scores given to individual questions.
- E: Question Type Settings: This section will be dynamically updated based on the question type you choose. For example, if you select multiple-choice, you will see fields to input the answer choices and identify the correct answer. Similarly, if you select short answer, you can specify whether the answer requires certain keywords. We will provide more information for this section later.
- F: Bonus Question: When checked, this question will be turned into a optional question that provides an opportunity for students to earn extra points beyond the total quiz points. Answering this question is not required, but it can increase student's overall score if they choose to do so.
2.1.1 Question Types:
Checkboxes / Multiple Choices:

The difference between a Multiple Choice question type and a Checkboxes question type is that only a single answer can be selected on a Multiple Choice question, whereas the examinee can select one or more answers on a Checkboxes question.

- A: The checked boxes will be treated as correct answer(s)
- B: You can use these input boxes for option text
- C: You can add Images for each option
- D: Remove corresponding option
- E: Add one more option
- F: When show the quiz, randomly change the option orders
- E: You can use these links to batch convert the option text into Pinyin, Zhuyin, or Chinese with Pinyin annotation.
Fill in the Blanks
Fill-in-the-blank quiz is a type of quiz or assessment in which the test-taker is asked to complete a sentence or statement by filling in one or more blank spaces with the appropriate word or words.
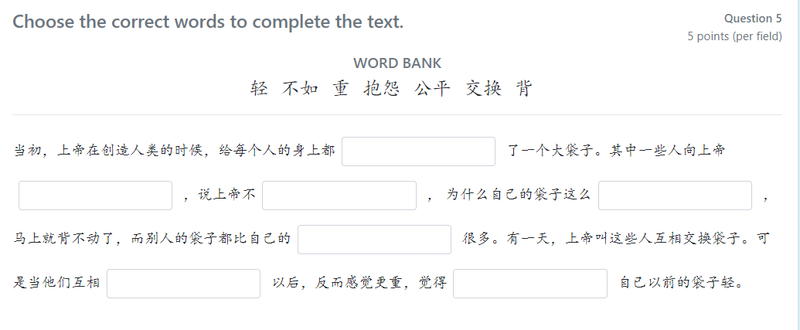
To add a Fill in the Blanks question.
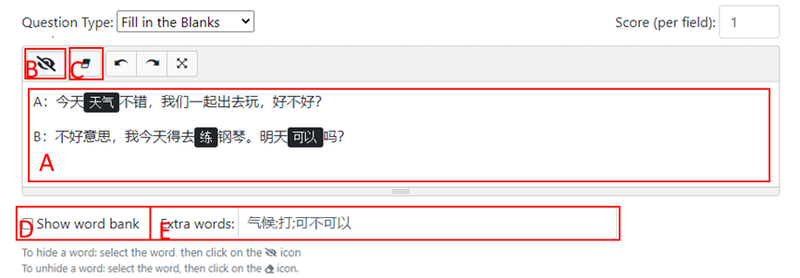
- 1. Please input the text you would like to use for your quiz into the provided text area (A).
- 2. Identify words you'd like to hide by selecting them and clicking the "Hide" button (B).
- 3. To unhide words, select them and click the "Unhide" button (C).
- 4. Toggle the "Show Word Bank" switch to show or hide the word bank for the examinee (D).
- 5. Increase quiz difficulty by adding extra words to the word bank in the "Extra Words" section (E). The extra words should be split by a comma (;)
Matching
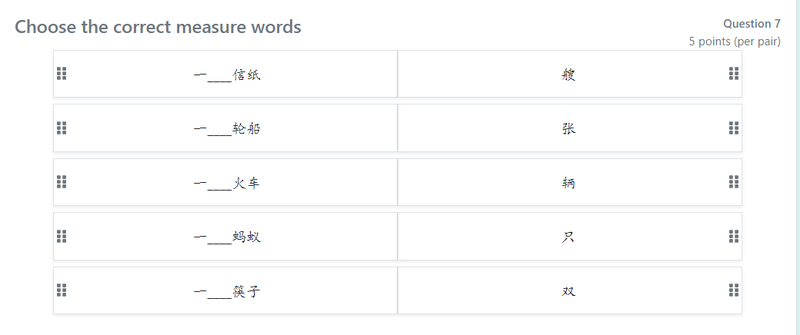
To add matching quesitons:
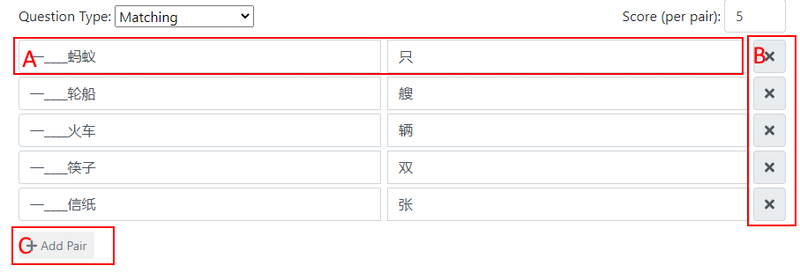
- A: Enter pairs of matching values, where each pair consists of a "left" value and a corresponding "right" value.
- B: To delete a pair, click the "Delete" button next to the pair you wish to remove.
- C: To add additional pairs, click the "Add Pair" button to create a new line for entering values.
When the question is displayed to examinees, the pairs will be randomly shuffled.
Sentence Scramble

- A. Input the sentence you would like to use into the provided text area. Please separate the words with spaces. The input can be in Chinese or Pinyin / Zhuyin.
- B. To delete a sentence, click the "Delete" button next to the corresponding sentence.
- C. To add an additional sentence, click the "Add Sentence" button to create a new line for entering values.
Short Answer
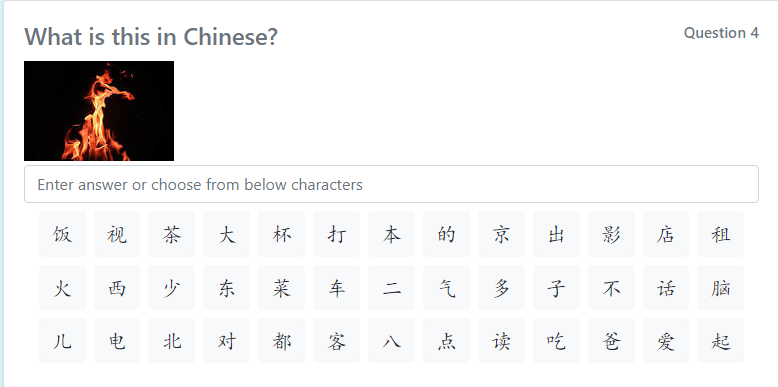
- A: Use this section for correct answers. You can choose from the following options:
- Exactly: Select this option if the correct answer should match the given answer exactly, with no variations allowed
- Contains: Select this option if the answer is correct as long as it includes the same keywords, regardless of their order or placement
- Any of: Select this option if there are multiple acceptable answers. Enter the list of acceptable answers, separated by semicolons
- B: Whether to show Word Bank or not. You can use this option to create a small word search puzzle.
You can also specify the corresponding HSK level or Pinyin tone marks (if the correct answer is a pinyin syllable). The correct answer will be mixed with you selected extra words.
Speaking
The Speaking Test feature allows exam takers to record their voice, which enables you to assess their pronunciation skills.

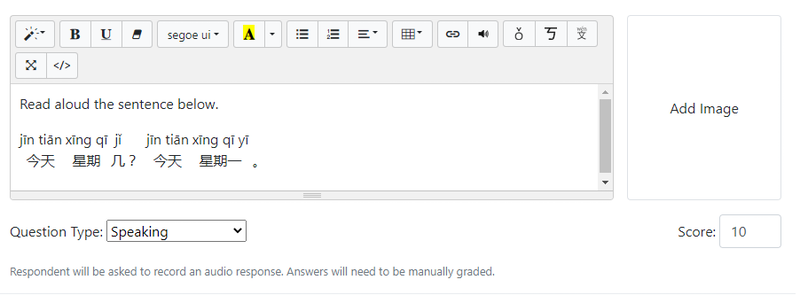
To create a speaking test, just use the textbox to input instructions. The recorded voice should be less than 60 seconds.
Please note that speaking questions need to be manually scored.
2.2 Adding text
To add questions, please click on the paragraph icon on the right side bar.
The Text Block function allows you to add descriptive text, instructions, or additional information to your quiz. Use this feature to provide context and guidance to the quiz-taker, or to share relevant details about a given topic. With the Text Block function, you can create a well-rounded and informative quiz experience for learners.
2.3 Adding audio
To add audio, please click on the headphone icon on the right side bar. This function allows you add audio to the quiz. There are 3 options:
2. 3.1 Record the audio yourself
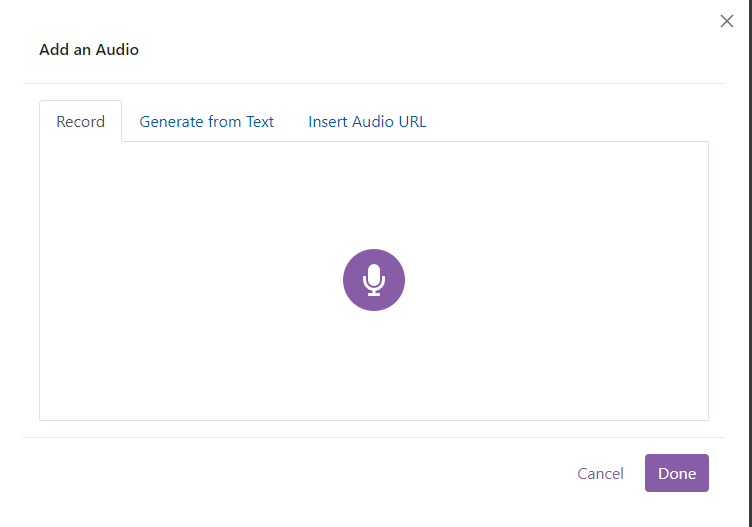
To start recording, simply click on the microphone icon and begin speaking. The microphone icon will change to a stop icon, indicating that the recording is in progress. You can click on the stop icon again to stop recording at any time. The recording can last up to 60 seconds.
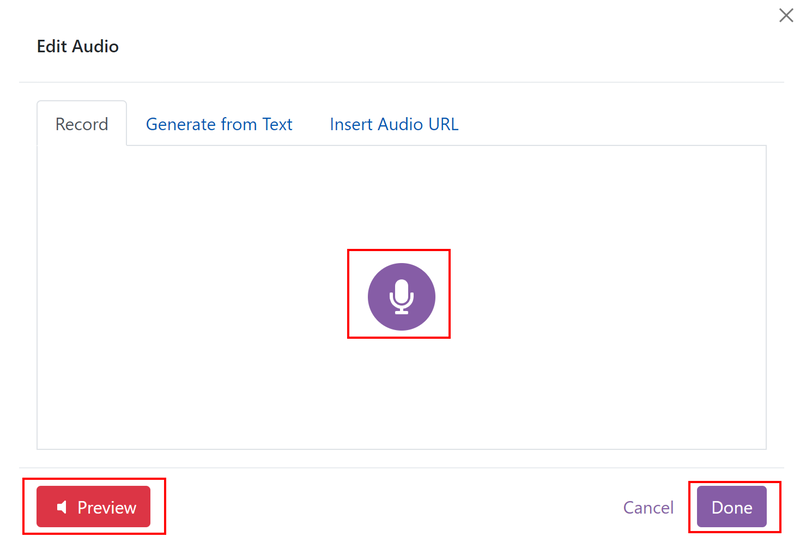
After stopping the recording, you can click on the Preview button to listen to your recording and check for any mistakes. If you find any errors, you can choose to re-record by clicking on the record button again. Alternatively, if you are satisfied with your recording, you can click on the Done button to insert it into the quiz.
2.3.2 Convert text into audio
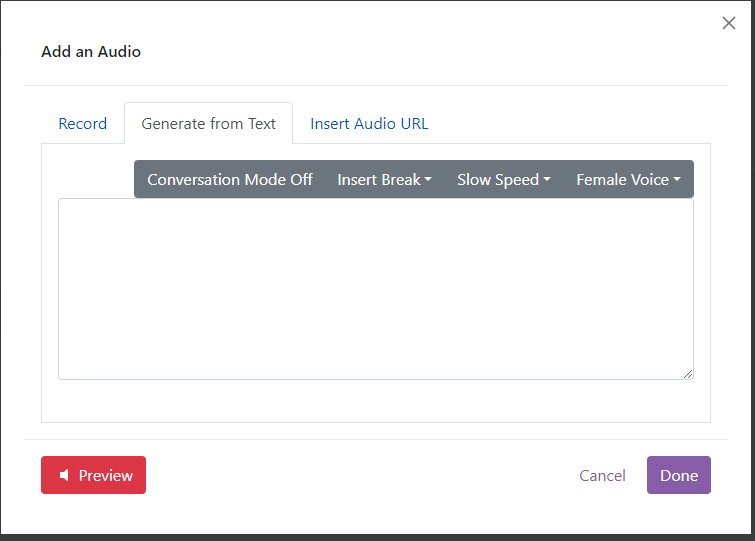
This function enables you to convert text into audio. To get started, simply paste the desired text into the text box. You can then choose the speed of the audio and the gender of the voice from the top menu buttons.
Additionally, this function allows you to create a two-person conversation. To do this, click on the "Conversation Mode" button to turn it on. For the text, make sure to separate each speaker's words into paragraphs. Our generator will use a different gender for each paragraph, and the last gender button setting will be used for the first speaker.
2.3.3 Insert a audio link.
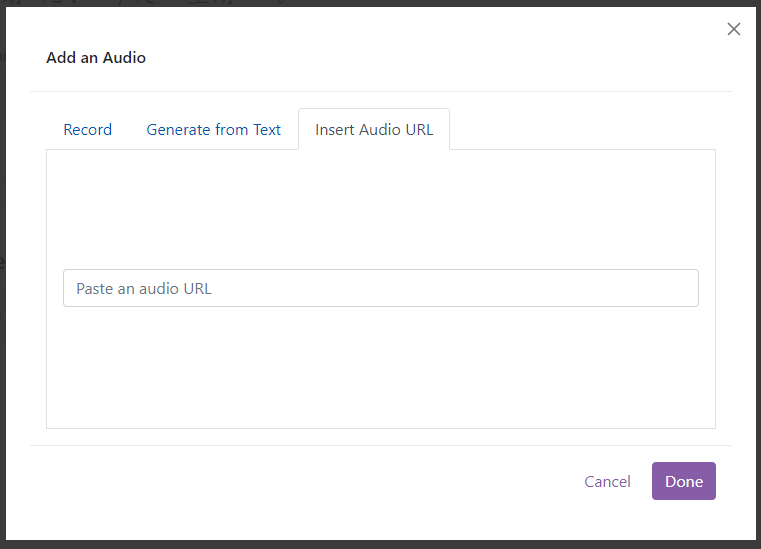
You can insert a existing audio URL into the textbox. The audio URL should end with .mp3, .wav, .ogg, or .aac.
2.4 Adding video
To add audio, please click on the video icon on the right side bar.
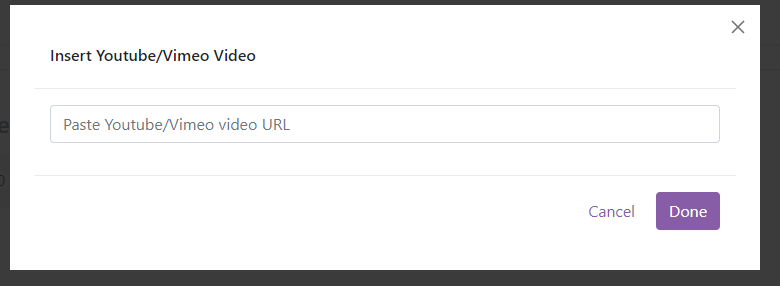
The Video Insert function allows you to add multimedia content to your quiz by inserting YouTube or Vimeo videos.
To do so, simply provide the link to your desired video through the provided textbox.
2.5 Edit Questions

For each question, you can drag and drop the grip icon at the top of the block to change the question order.
To edit a question, you can click on the "Edit" button located at the bottom of the question block. This will open up a window where you can make any necessary changes to the wording or formatting of the question.
If you need to duplicate a question - perhaps because it is similar to another one, or you want to create a backup copy - the "Copy" button is there for you. This will create an exact replica of the question within the same questionnaire, allowing you to make any changes needed to the copied version without affecting the original.
Finally, if you decide that a particular question is no longer relevant or necessary, you can use the "Delete" button to remove it from the quiz entirely.
2.6 Quiz Settings
You can view and update the current quiz settings by clicking on the "Settings" button. You will see at popup with 3 tabs:
2.6.1 General
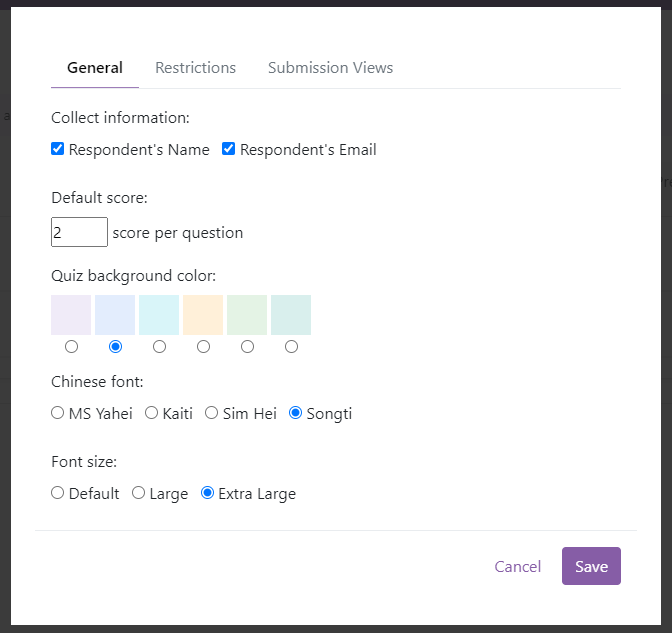
- Default Score: The score assigned to new questions by default. Please note that changing this value will not affect the scores of existing questions.
- Collect information: You can choose whether the respondent needs to provide their name/email when submitting a response.
- Quiz background color / Chinese font / font size: You can choose the default background color, font family, and font size to be used in the quiz layout. These settings will be applied to all respondents viewing the quiz.
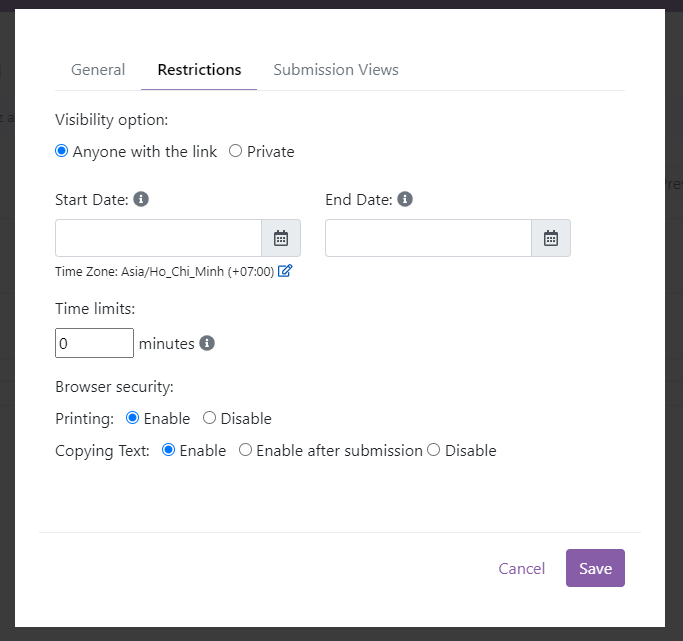
- Visibility: You have the option to choose whether the quiz is visible to the public. When set to "Private," only you will have access to the quiz.
- Start Date / End Date: Set the time period during which the quiz will be available.
- Time Limits: Specify the maximum amount of time respondents can take to complete the quiz. Once the time limit is reached, the quiz will be automatically submitted.
- Browser Security: In this section, you can disable printing and copying functions for respondents taking the quiz. Please note that if you want to allow respondents to use a popup dictionary during the quiz, the copying function needs to be enabled
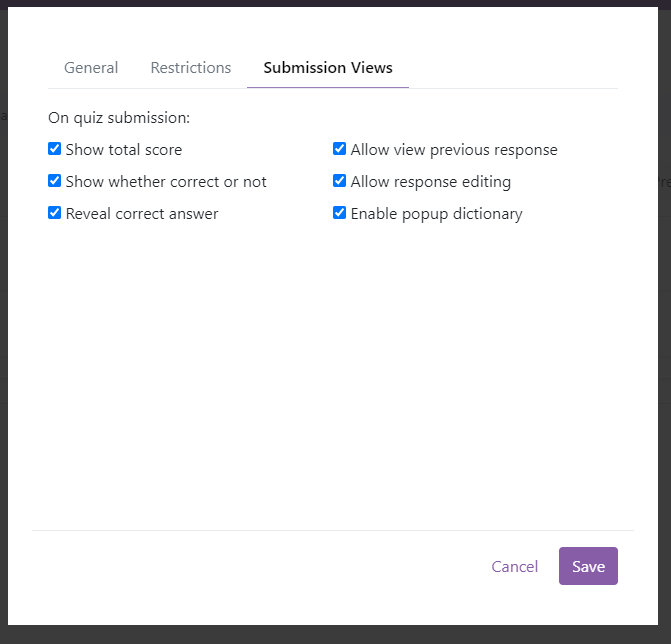
In this section, you can select the information that will be displayed once the respondent has submitted the quiz.
- Allow View Previous Responses: You have the option to allow respondents to view their submissions at a later time by providing them with a unique link after they submit their response.
- Allow Response Editing: Once the quiz is submitted, respondents will be able to edit their responses. By enabling this option and disabling "Reveal Correct Answer," you can create a quiz where respondents can identify and continue practicing the questions they answered incorrectly until they correct all of them.
- Enable Popup Dictionary: When this option is enabled, respondents can select Chinese characters and a popup dictionary will appear.

2.7 Save a Quiz
To save the quiz, please click on the save icon on the sidebar. You will see a success msg on the top of your screen once the quiz is saved.

2.8 Assign a Quiz
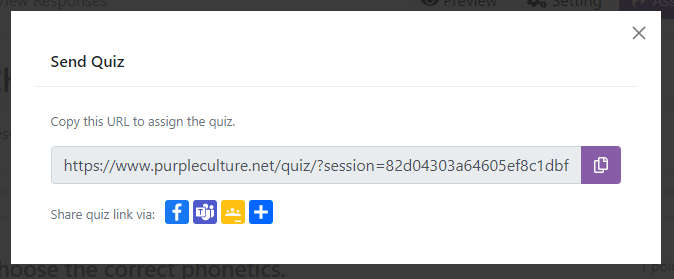
To assign the quiz, simply click on the "Assign" button located at the top of the page.
A popup window will appear where you can copy the unique link or share it directly on popular platforms such as Google Classroom, MS Teams, Facebook, etc.. This allows you to easily share the quiz with your intended audience.
2.9 Generate from a Vocabulary List or Sentence List
You may check for this article more information.
3. View Quiz Responses
3.1 Quiz Reponses Report
You can check quiz response by clicking on the View Responses button on the top of Quiz Marker page.
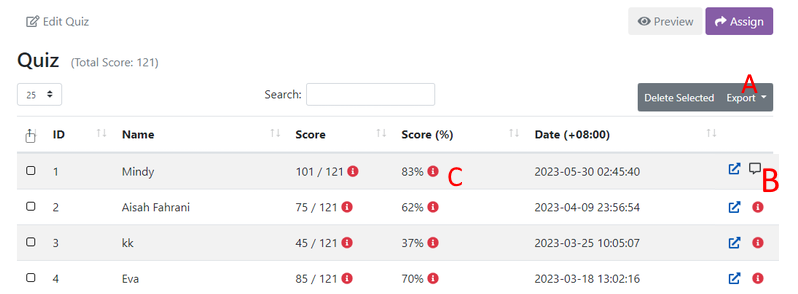
- Export: You can easily export the response list to Excel format or copy them to Word.
- You can click on the external link icon to view each individual response. The red information icon indicates that the quiz response contains speaking questions that require manual scoring. The speech icon indicates that feedback has been added to the corresponding quiz response. You can hover over the icon to preview the feedback.
- Score: If there is an exclamation mark displayed after the score, it indicates that some questions need to be manually scored.
3.2 Manual Score
To manually score a response, click on the "View" button on the Responses page. This will show the individual reponse.
Please go to the question you would like to update score, and input the correct score in the corresponding textbox.
Once you have assessed all the questions and assigned scores, click on the "Save" button located on the right sidebar.

3.3 Provde feedback
As the quiz owner, you have the ability to provide overall feedback for each quiz response. To add feedback, please follow these steps:
- Click on the "View" button on the Responses page, which will lead you to the individual response page.
- Scroll down the page until you reach the bottom.
- At the bottom of the page, you will find a text box labeled "Overall Feedback."
- You can enter your feedback in this text box.
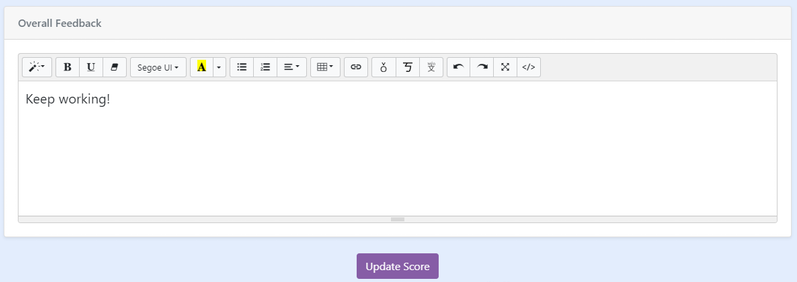
By providing overall feedback, you can offer additional comments or guidance to the respondent based on their performance in the quiz.
